Stable Diffusion: three ways to interact with the model (for free)
I finally found the time to play around with text-to-image AI models myself. And since I manged to create better artworks this way than ever before in my life I decided that this is a good to revive my blog. The model that I used was the Stable Diffusion model that is open source and easily available from the HuggingFace model hub. I decided to install it locally in order to have full flexibility and make use of my GPU. But you actually can play around with it pretty nicely in your browser as well through the following interfaces that are publicly accessible through HuggingFace spaces.
Image from text
The most straightforward entry point to the model is “text to image”: you simply need to provide a text (also called a “prompt”) that describes the image that you want to get. The associated HuggingFace space can be found here: stabilityai/stable-diffusion-1.
As it turns out it is actually not that easy to come up with a suitable text input that will give you an outstanding image from the model right away. Luckily, there are some example prompts already given in the HuggingFace space. And with a bit of help from Google I also found some pretty nice example inputs that I used to play around with. The two examples below are from Best 100 stable diffusion prompts. Another great web page that I came across is Lexica.
The first prompt that I tried was:
portrait photo of a asia old warrior chief, tribal panther make up, blue on red, side profile, looking away, serious eyes, 50mm portrait photography, hard rim lighting photography–beta –ar 2:3 –beta –upbeta –upbeta
It gave me some really impressive photorealistic images:
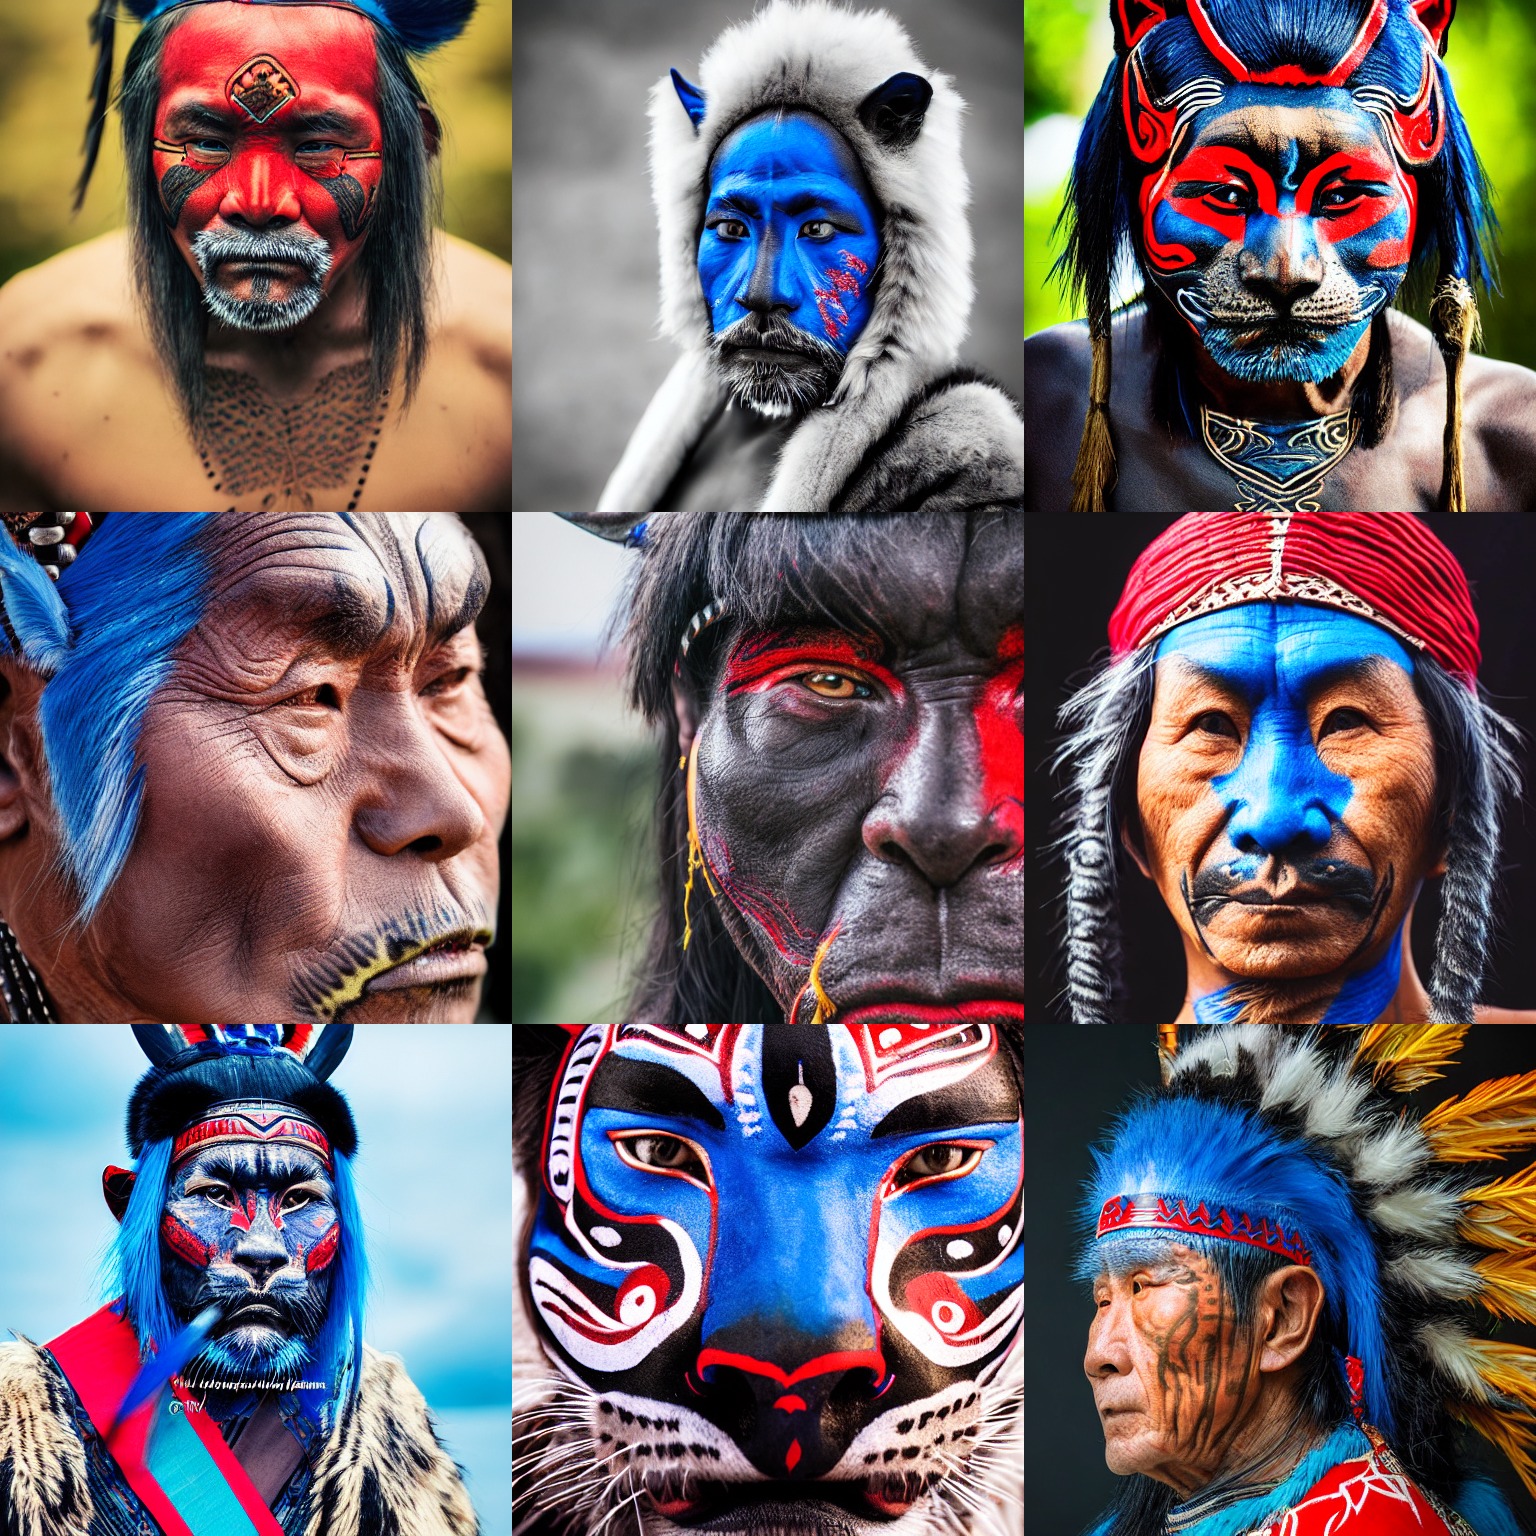
As you can see, the prompt not only describes the motives of the image that should be shown, but also the style of the image. Sometimes you might want to have an image that looks like a real photo. But sometimes you might want to have different styles, like e.g. an image that looks like an oil painting or an image that looks like out of a Pixar movie. This description of the image style can be especially cryptic. For example, the phrases –ar 2:3 –beta –upbeta –upbeta actually don’t have any meaning to me. The model was trained on images and their captions from the internet, and hence it tends to reproduce the labeling behavior that is used there. So if people tend to write into photo image descriptions the exact type of camera lense (e.g. 50mm) that was used, then anything that relates to camera lenses might signal to the model that a photorealistic image should be created.
The second prompt that I tried was less photorealistic and more of a Pixar movie art. Again, there are some rather disconnected buzzwords at the end of the prompt in order to indicate the expected style of the image. We get a colorful image of a mad scientist:
glowwave portrait of curly orange haired mad scientist man from borderlands 3, au naturel, hyper detailed, digital art, trending in artstation, cinematic lighting, studio quality, smooth render, unreal engine 5 rendered, octane rendered, art style by pixar dreamworks warner bros disney riot games and overwatch.

Image from text, including negative prompt
A slightly different entry point to the model we get on the following HuggingFace space: stabilityai/stable-diffusion. In addition to the description of the image we now get another text input where we can specify things that the image should NOT include. This second part is called a “negative prompt”. It comes in pretty handy whenever you need to break a link between certain co-occurring image components. For example, a warrior chief might be associated with feather decoration by the model based on the images that were used to train the model. In order to break that link and create an image of a warrior chief without feathers we can use the negative prompt to make sure that no feathers will be included. The following image shows some generated images based on text input with such a negative prompt:
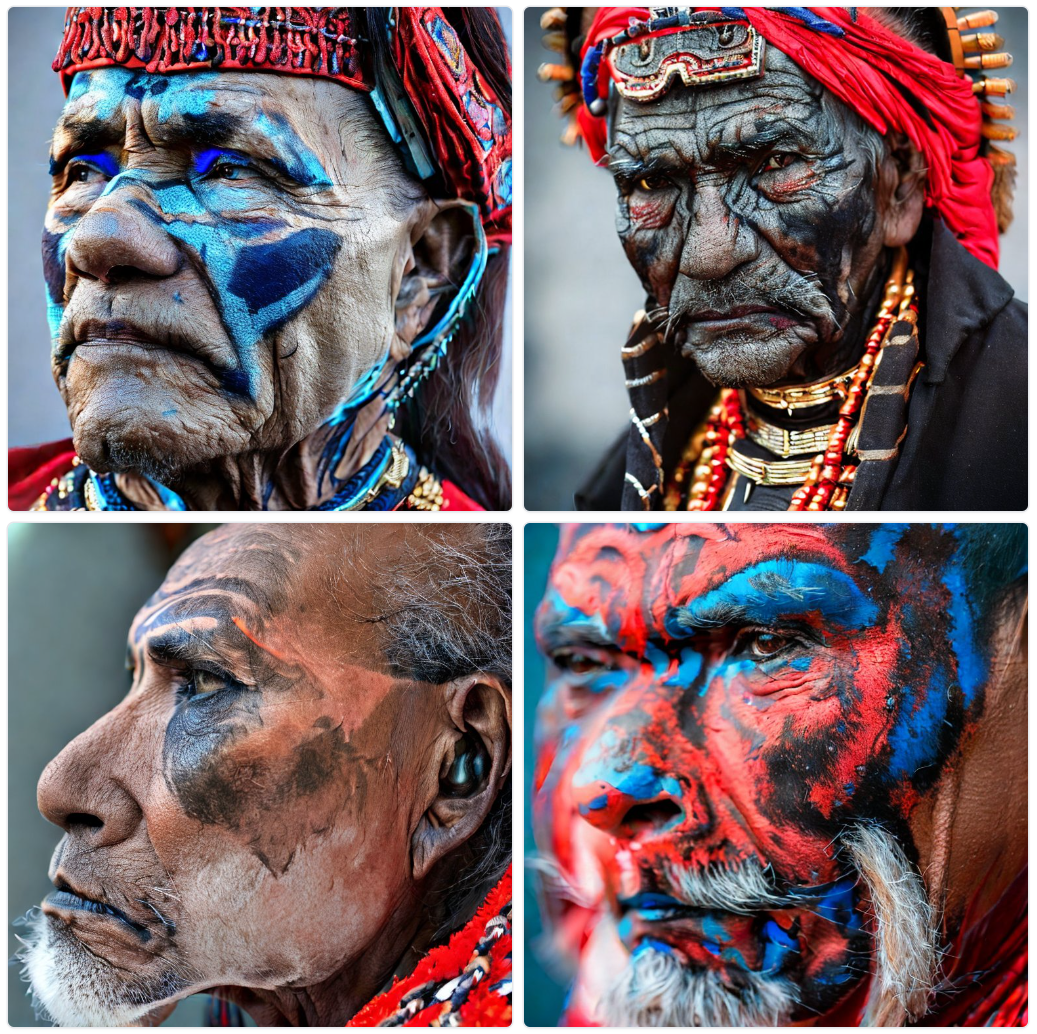
Image inpainting
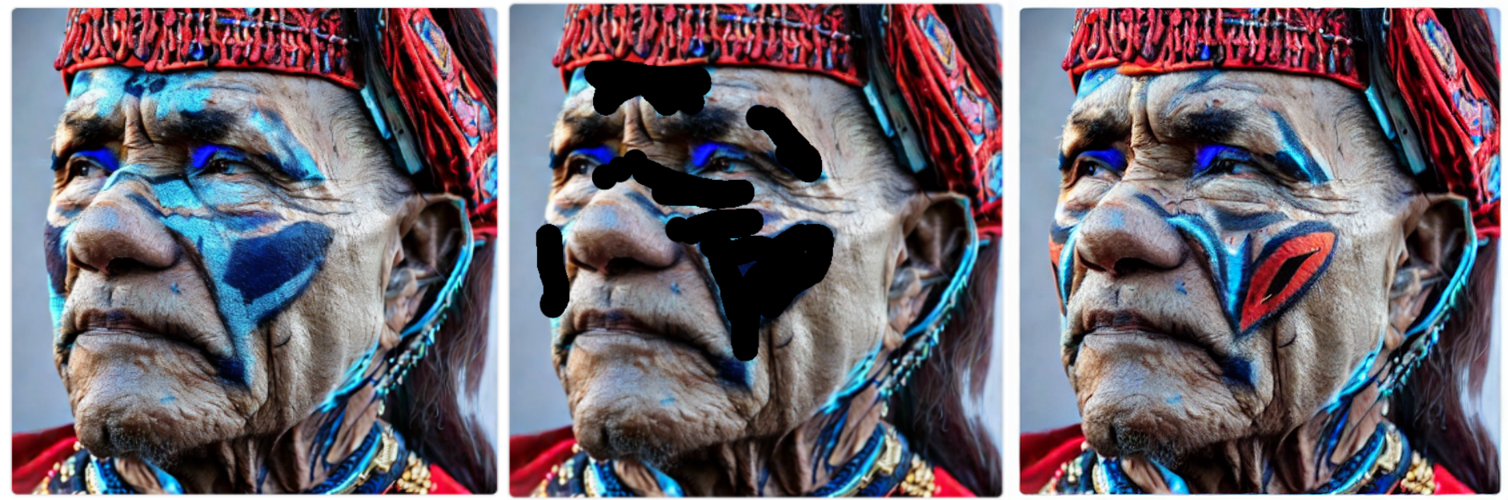
There exists even another entry point to the text to image model on HuggingFace: multimodalart/stable-diffusion-inpainting. This user interface is called “image inpainting” and it can be used to modify existing images. The idea behind it is to use the model to complete images where parts of the image are missing. In the example below, you can see an input image of a warrior chief on the left. I used this image as a starting point for further refinements. Next step is that we need to “remove” certain areas from this image again such that they can be re-generated by the model based on some text prompt. There are two ways to remove areas in this user interface. First, you can use the mouse to construct a black “mask” for those regions. The mask will indicate all areas of the image that should be removed. This is how I did it in the example and the corresponding black mask can be seen in the image in the middle. A second way to encode the mask would be through a text prompt. Once the mask has been constructed, the now only partially completed image can be finalized with another text prompt. So in this example I used image inpainting to modify the face make up of the warrior chief. The final image after image inpainting can be seen on the right.
Real-world challenge
Now that we know how to interact with the stable diffusion model, I also wanted to use my knowledge for some tough first real-world challenge. So I asked my three year old son for some fantasy animal to be generated, and he did go for some regularly shaped elephant that has a fur like a giraffe. This is what I came up with after some 20 minutes of trial and error:
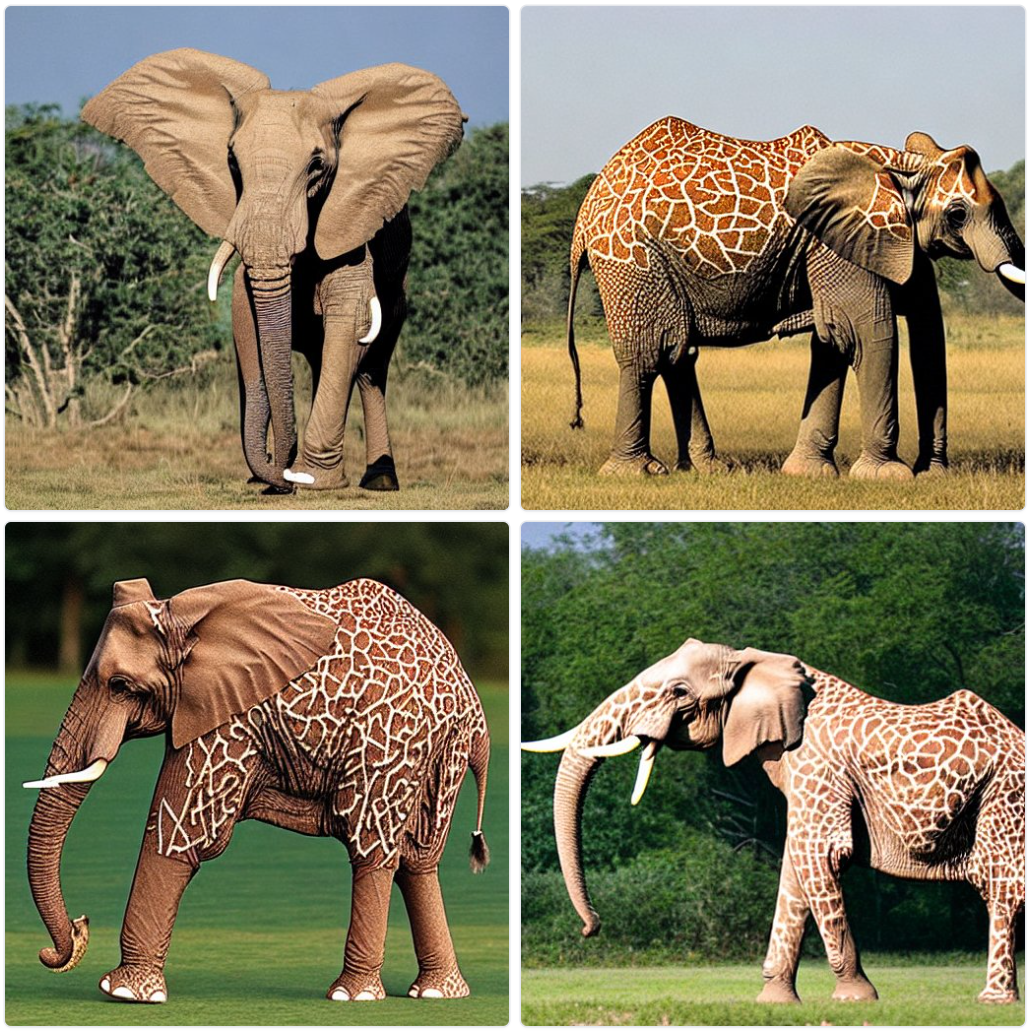
Can you do better?